.

Solo Teckno

Sharing Centre

This is default featured post 2 title

Go to Blogger edit html and find these sentences.Now replace these sentences with your own descriptions.

This is default featured post 3 title

Go to Blogger edit html and find these sentences.Now replace these sentences with your own descriptions.

This is default featured post 4 title

Go to Blogger edit html and find these sentences.Now replace these sentences with your own descriptions.

This is default featured post 5 title

Go to Blogger edit html and find these sentences.Now replace these sentences with your own descriptions.

Tuesday, November 19, 2013

Cara Membuat Multiboot di USB Flashdisk


Cara Membuat Multiboot di USB Flashdisk itulah artikel yang akan saya informasikan buat anda. Apabila anda ingin menginstall sistem operasi seperti Linux dan Windows atau yang lainnya maka anda bisanya menggunakan CD namun jika laptop atau komputer anda tidak memiliki CD Drive maka alternatif untuk menginstall adalah dengan menggunakan fd atau flashdisk. Cara mudah untuk membuat multiboot di usb flashdisk ini dengan menggunakan YUMI (Your Universal Multiboot Installer). Multiboot sendiri artinya 
membuat boot dua atau lebih OS/Distro/ISO dalam satu flashdisk yang bisa dijalankan melalui fd.


Cara Membuat Multiboot di USB Flashdisk


YUMI (Your Universal Multiboot Installer) adalah sebuah aplikasi yang digunakan untuk membuat multiboot dengan menggunakan media usb flashdisk. Aplikasi ini sendiri mendukung banyak OS/Distro/ISO serta antivirus dan sofware lainnya. Anda bisa melihat pada list box aplikasi tersebut pada saat menjalankan aplikasi ini. Aplikasi multiboot flashdisk ini sendiri bersifat portable jadi tidak perlu di install cukup mengklik program ini dan akan langsung berjalan di komputer.


Cara Membuat Multiboot di USB Flashdisk dengan menggunakan YUMI sangat mudah tinggal mengikuti langkah-langkah berikut ini:
2. Sediakan Fd atau Flashdiks kosong yang berkapasitas 8G atau di atasnya.
3. Colok flashdisk tersebut di komputer.
4. Jalankan program YUMI nya.

Cara Membuat Multiboot di USB Flashdisk


5. Perhatikan gambar yang di lingkari. Pertama tentukan drive flashdisk anda kemudian centang pada format drive. Lalu pada list box nya pilih OS/Distro/ISO yang ingin di buat multiboot. Kemudian klik menu browse untuk mencari file OS/Distro/ISO yang ingin dibuat. Disini saya menggunakan windows xp. Kemudian klik create.

Cara Membuat Multiboot di USB Flashdisk

6. Pada tahap ini yaitu proses format dan pengkopian file sedang berlangsung. Silahkan tunggu sampai semua proses selesai dilakukan. Jika proses selesai dilakukan maka akan muncul kota pesan yang menyatakan would you like to add more ISO/Distro Now ? maka anda pilih yes untuk melanjutkan memilih file lain.
Cara Membuat Multiboot di USB Flashdisk

7. Setelah itu akan muncul kembali halaman seperti pertama. Silahkan lakukan lagi hal seperti diatas dimana memilih OS/Distro/ISO yang ingin dibuat klik browse lalu create. Pengaturan yang lain abaikan saja jangan di centang.

Cara Membuat Multiboot di USB Flashdisk


8. Tunggu sampai prosesnya selesai. Jika selesai maka akan muncul pemberitahuan seperti diatas. Jika masih ingin melanjutkan atau membuat multiboot yang lain klik yes jika tidak klik no lalu finish.

YUMI sendiri bisa membuat multiboot di flashdisk lebih dari 2 OS/Distro/ISO seperti kita bisa membuat Linux-windows 8-Windows XP, Ataupun Linux-Windows 7-Windows XP-ISO-Antivirus dalam satu flashdisk.

Itulah artikel tentang Cara Membuat Multiboot di USB Flashdisk menggunakan YUMI semoga bermanfaat bagi anda.


Sumber: 


Monday, November 18, 2013

RESTORE WINDOWS 7 DENGAN SYSTEM RESTORE

Apakah komputer kamu bermasalah setelah menginstall software, menginstall driver, atau setelah mengubah setting tertentu? Cara termudah untuk menghilangkan masalah tersebut adalah dengan melakukan restore Windows.
Melakukan restore Windows di Windows 7 sangatlah mudah, cukup ikuti panduan yang sudah WinPoin siapkan berikut ini:
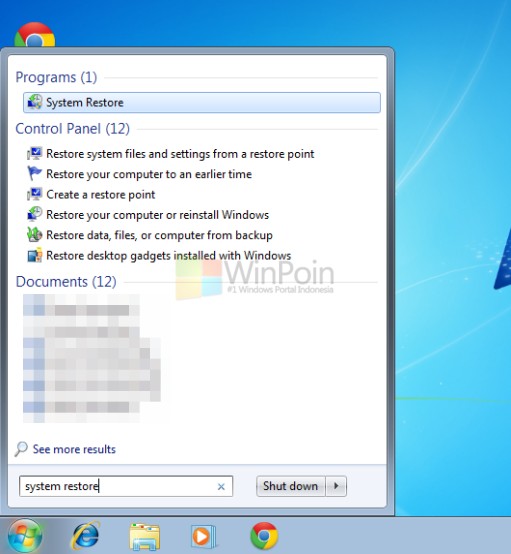
1. Buka Start Menu lalu ketikkan System Restore dan Enter
Cara Restore Windows 7 dengan System Restore

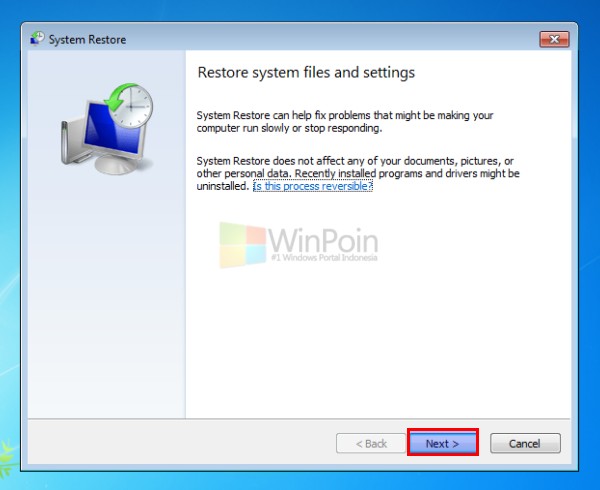
2. System Restore Window akan terbuka, klik Next
Cara Restore Windows 7 dengan System Restore
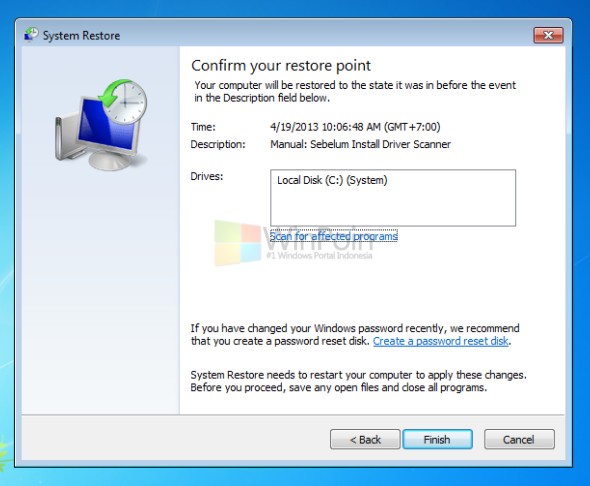
3. Pilih restore point yang ingin kamu gunakan. Restore Point ini berisi “backup” registry dan berbagai pengaturan Windows. Setiap registry dan pengaturan Windows akan dikembalikan ke titik dibuatnya Restore Point tersebut
Cara Restore Windows 7 dengan System Restore
4. Klik Finish
Cara Restore Windows 7 dengan System Restore
5. Klik Yes, pastikan kamu menunggu hingga proses restore selesai.
Cara Restore Windows 7 dengan System Restore

Setelah proses restore selesai, maka kondisi komputer kamu akan kembali ke kondisi saat restore point dibuat. Restore Point ini dibuat oleh sistem secara otomatis dalam periode tertentu, atau kamu juga bisamembuat restore point sendiri secara manual.
Dengan melakukan restore Windows, kamu bisa mengembalikan kondisi Windows seperti sebelum saat terjadinya error.

Tips dalam memilih Restore Point

Jika ada beberapa restore point dan kamu bingung memilih yang mana, maka pilihlah restore point yang terbaru. Jika restore point tersebut ternyata tidak berhasil memperbaiki masalah, maka kamu bisa mencoba restore menggunakan Restore Point lainnya yang lebih lama. Begitu seterusnya.

Jika System Restore gagal menyelesaikan masalah?

Walaupun kemungkinan berhasil System Restore sangatlah tinggi, namun tidak menutup kemungkinan jika tool tersebut gagal memperbaiki masalah yang kamu alami. Jika hal itu terjadi, cobalah gunakan restore point lainnya yang tersedia. Jika masih gagal memperbaiki masalah, maka gunakan Advanced Recovery Method .

Sunday, November 17, 2013

Creating a Bootable USB Drive with True Image 2014

Creating a Bootable USB Drive with True Image 2014

Acronis True Image Home 2014 recovers all your data and puts everything back exactly where it was in case of a disaster. The new version enables you to sync files across multiple devices, use online-backup service for extra safety. And what is more, it supports Windows 8 OS! Friendlier user interfaces makes it easier than ever to backup and restore your data. The new Extended Capacity Manager to allow you to take advantage of more than 2 Terabytes of external storage that some versions of Windows may not allow.  Also new is the ability to take an image directly to the Acronis Cloud and incremental backup to online storage. See our full review about what is new in the new Acronis version.
This review of True Image 2014 will show how easy it is to create a bootable USB flash drive to store an image of the computer on the drive so you can carry it anywhere.
It is always a good idea to make a bootable rescue media when using Acronis True Image Home.  If your computer become so unstable that it is unbootable, you can use the rescue media to restore a previously created image to get your computer up and running quickly and easily. We have reviewed how to create a bootable CD in previous versions of True Image and that process has not changed.  In this review of Acronis True Image 2014, a bootable USB drive will be created so an image can be stored on the drive.
Acronis has always made it easy to create a rescue media and the creation of a bootable USB drive using True Image 2014 is no exception. From the Backup and Recovery tab, simply select the Create Bootable Media button as the following screenshot demonstrates.
Create Bootable Media
Then you are welcomed to the Acronis Media Builder.  The Wizard will help you create a bootable media with the components that you select.
The Acronis Media Builder
The following screen shows the bootable components available to place on the bootable media.  Once the media is created, you will be able to boot into the media and run the selected components.  I chose to insert the Acronis True Image Home program and the Acronis System Report.  The Acronis True Image 2014 program includes drivers for USB, PC Card and SCSI hard drives. 
Rescue Media Contents Selection
The next relevant screen gives the option to select a drive to be used to create the bootable media.  I chose the removable disk which is the 64 Gigabyte USB Drive.
The next screen shows the details of the operations that Acronis True Image will be performing.  It looked good to me so naturally I smacked the Proceed button to create the bootable USB drive.
Details of the operations that Acronis True Image Home 2010 will be performing
When it was done, it told me so.
Bootable USB Drive has Been Successfully Created
Now let’s see if it works.  Depending on your computer manufacturer, you may need to press a key or invoke a set of keys to make your computer boot to the USB Drive.  You may even have to go into the BIOS to change settings to boot from a USB drive.  Consult your computer manufacturer for instructions on how to do that. 
For instance, this review of Acronis True Image was compiled using a Dell Inspiron 15R laptop.  I had to press the F12 key at initial boot up to invoke the following screen where I could select the USB drive to boot.
Boot Device Menu
Once the boot device was selected, the computer booted to the Acronis True Image Home program in low-level mode as shown in this screenshot.
True Image low level startup screen
Clicking on the start button brings up the Acronis True Image Program as it looks like booted from the flash drive. From that screen you can backup, recover and use the utilities available in the program without actually booting your PC to Windows.
The Acronis True Image screen as seen booted from the flash drive
Once the bootable USB flash drive is created, simply create a new backup job to create an image directly on the drive. Alternatively, you could skip the above steps and just check the “make this media bootable” option in the disk backup screen but what fun would that be :-)
Select the flash drive aa the backup destination
The Acronis Bootable media, whether you choose to make a bootable CD or USB drive is an important step to protect your Operating System and important data from being lost forever.  Hard Drives crash, Windows crashes and there are many unforeseen events that could happen to make your computer unusable.  The Bootable Rescue Media could very well be a lifesaver when it comes to retrieving data. See how easy it is to take an image of a drive and put it on a USB Flash Drive.
Once again, Acronis has made it very easy to protect your data with this new release of True Image.  This is a recommended utility to have in your arsenal of data backup and recovery utilities. 

Acronis True Image 2014

Acronis True Image
Acronis True Image 2014 has just been released with some exciting new features including full Windows 8 Certification. True image now comes with 5 Gigabytes of Cloud Storage, it allows you to take an image of your hard drive to the cloud and do full incremental backups directly to the online storage service. The hard drive backup and imaging program still has all of the useful features as before with some great improvements including virtual hard drive support and the Universal Restore feature which allows you to restore an image to dissimilar hardware or a virtual machine.  See our Full Review of True Image. True Image now supports Windows 8 and includes an optional online backup solution to keep your files safe, secure and available.
Order Acronis True Image 2014 $49.99

Acronis True Image 2014 Premium

Acronis True Image 2014 Premium
The True Image 2014 Premium package has all of the features of the regular version with a couple of essential tools that may be necessary for more advanced users.  The premium version allows you to migrate files, folders or the entire system to a new computer. It also allows you to restore files and images to anywhere needed, including dynamic disks and WinPE environments. This version also enables you to backup and restore dynamic disks.
Order Acronis True Image Premium $79.99

Acronis Online Backup

Acronis Online Backup Solution


ARTIKEL INI HANYA COPAS DARI SINI 
Acronis Online Backup has been released featuring 250 Gigabytes of secure storage space for up to five computers.  Acronis has long been a leader in data backup and recovery solutions and the addition of cloud backup capabilities, they have taken a huge step in keeping your data even more safe and secure.  The online backup solution can either be integrated with Acronis True Image or used as a standalone program. See our Review of Acronis Online Backup. Save 10% off of your purchase of Acronis Online Backup with the following Acronis Coupon Code: COOLAOB2010
Order Acronis Online Backup $49.9


Sunday, November 10, 2013

RESET PRINTER EPSON L SERIS

Berikut adalah tutorial cara Reset Epson L110 L210 L300 L350 L355 menggunakan software resetter adjprog gratisan. software ini digunakan apabila printer Epson L110 L210 L300 L350 L355 kita berhenti ngeprint dan ada laporan minta reset dikarenakan "ink waste full" atau printer melebihi  batas print yg sudah di tetapkan oleh pihak Epson.

Silahkan Download Software Resetter Epson L110 L210 L300 L350 L355 di link yang saya sediakan di bawah ini :
DOWNLOAD

1. Hidupkan Printer dan instal Driver Printer bila belum terpasang di komputer.
2.Jalankan program Resetter Epson L110 L210 L300 L350 L355 dengan doble klik Adjprogcracked.exe
3.Ikuti petunjuk gambar berikut ini :


klik select


Pilih Model printer anda dan klik tombol OK


Pilih Waste ink pad counter dan klik ok

centang main pad counter dan klik tombol check

adjprog akan membaca status waste ink pad counter printer anda

Bila sudah terlihat status waste ink pad counter printer anda, centang main pad counter kemudian klik tombol initialization 

Klik tombol OK

matikan printer anda dan klik OK

Proses reset sudah selesai dan hidupkan kembali printer anda


Untuk memastikan proses reset waste ink pad counter telah berhasil, silahkan centang main pad counter dan klik tombol get status

Disini terlihat nilai main pad counter berada di posisi nol (0) dan printer anda siap dijalankan kembali.


Sunday, June 23, 2013

ACCOUNT GRATIS SSH UPDATE 23 JUNI


Update lagi nih mayan lah buat koleksi ha,ha


SSH ArgentinaPort 22
SSH Australia 1 dan 2 Port 22
SSH Bahrain Port 22
SSH Denmark Port 22
SSH Italia 1 dan 2 Port 22
SSH Malaysia Port 22
SSH Senegal Port 22
SSH Inggris 1 dan 2 Port 22
 
SSH Australia Port 22
SSH Hongkong Port 22
SSH Indo Port 443
SSH India Port 22
SSH Italia 1 dan 2 Port 22
http://adf.ly/Qwt5I

SSH Japan 1 sampe 3 Port 22
SSH Korea Port 22
SSH Mexico Port 22
http://adf.ly/QwtHj

SSH Thailand 1 dan 2 Port 22
http://adf.ly/QwtMI

SSH USA Port 22
http://adf.ly/QwtRq
 
 
NB: 
   - Hanya bisa digunakan untuk tunnel menggunakan bitvise.
   - Gunakan bitvise versi baru
   - Ingat jangan tepaku pada screenshot diatas karena beda tempat,modem,dll sangat mempengaruh'i speed.
 

Tuesday, June 18, 2013

ACCOUNT GRATIS SSH UPDATE 18 JUNI


Slamat siang,, Dari pada g ada kerjaan nih ane kasih update lagi download aja buat cadangan yang kemaren cari speed yang paling kenceng tinggal pilih ha,ha,,

SSH Australia 3 buah Port 22
http://adf.ly/QiNh5

SSH Norwegia 3 buah Port 22
http://adf.ly/QiNl9

SSH Turki 1 buah Port 443
http://adf.ly/QiNrq

SSH United Kingdom 3 buah Port 22
http://adf.ly/QiNuh

SSH USA 5 buah Port 22
http://adf.ly/QiO0x

NB: 
   - Hanya bisa digunakan untuk tunnel menggunakan bitvise.
   - Gunakan bitvise versi baru
   - Ingat jangan tepaku pada screenshot diatas karena beda tempat,modem,dll sangat mempengaruh'i speed.

Saturday, June 15, 2013

ACCOUNT GRATIS SSH UPDATE 15 JUNI

Update lagi nih,,,


 Klik Gambar SS Untuk Download
Malingsia 1 dan 2 Port 22

Cina 1 dan 2 Port 22

Singa Port 22

Hongkong Port 22

Vietnam Port 22

Japan 1 dan 2 Port 22
NB: 
   - Hanya bisa digunakan untuk tunnel menggunakan bitvise.
   - Gunakan bitvise versi baru
   - Ingat jangan tepaku pada screenshot diatas karena beda tempat,modem,dll sangat mempengaruh'i speed.